

The admin panel
The admin panel (admin/ in the repository) is a React application built on Umi and Ant Design
Pro. It has no data of its own: every screen calls the ulams REST API, and what you can see and
do depends on the permissions of your account.
Each tenant has its own admin panel host. In local development it is {slug}.admin.localhost,
for example http://coffee.admin.localhost, and the panel derives the tenant API host from it
(http://coffee.localhost). Accounts, roles, settings and content belong to one tenant; an
account in one tenant cannot sign in to another. See Tenants and
Tenancy.
Signing in
Section titled “Signing in”The sign-in screen is at /user/login. Enter your email and password; Remember me is
sent with the request. After a successful sign-in the panel stores the API token in the
browser, loads your user, the tenant settings, the list of installed packages and the panel
translations, and opens the page you were trying to reach (or the dashboard).
Any account can sign in, but the panel only shows screens the account has permissions for.
An account without the access dashboard permission (the default student role) sees no
menu at all.
The look of the sign-in screen comes from the global settings logoLogin,
showLoginBackgroundImage, loginHeaderBackgroundColor, loginHeaderFontColor and
loginFormBackgroundColor (see Settings).
Forgotten password
Section titled “Forgotten password”- On the sign-in screen click Forgot password, enter your email and send the form. The
API (
POST /api/auth/password/forgot) emails a reset link that points back to the panel’s/user/reset-passwordpage. - The link carries
tokenandemailin the query string. Enter a new password on/user/reset-password; the panel sends it with the token toPOST /api/auth/password/resetand returns you to the sign-in screen.
The email is built from the template for the ResetPassword event (see
Templates).
Signing out and your profile
Section titled “Signing out and your profile”The avatar menu in the top-right corner leads to My profile and signs you
out. Next to it are the notification bell (see Notifications) and the
language switcher, which changes the panel language and the X-locale header sent to the API.
The dashboard
Section titled “The dashboard”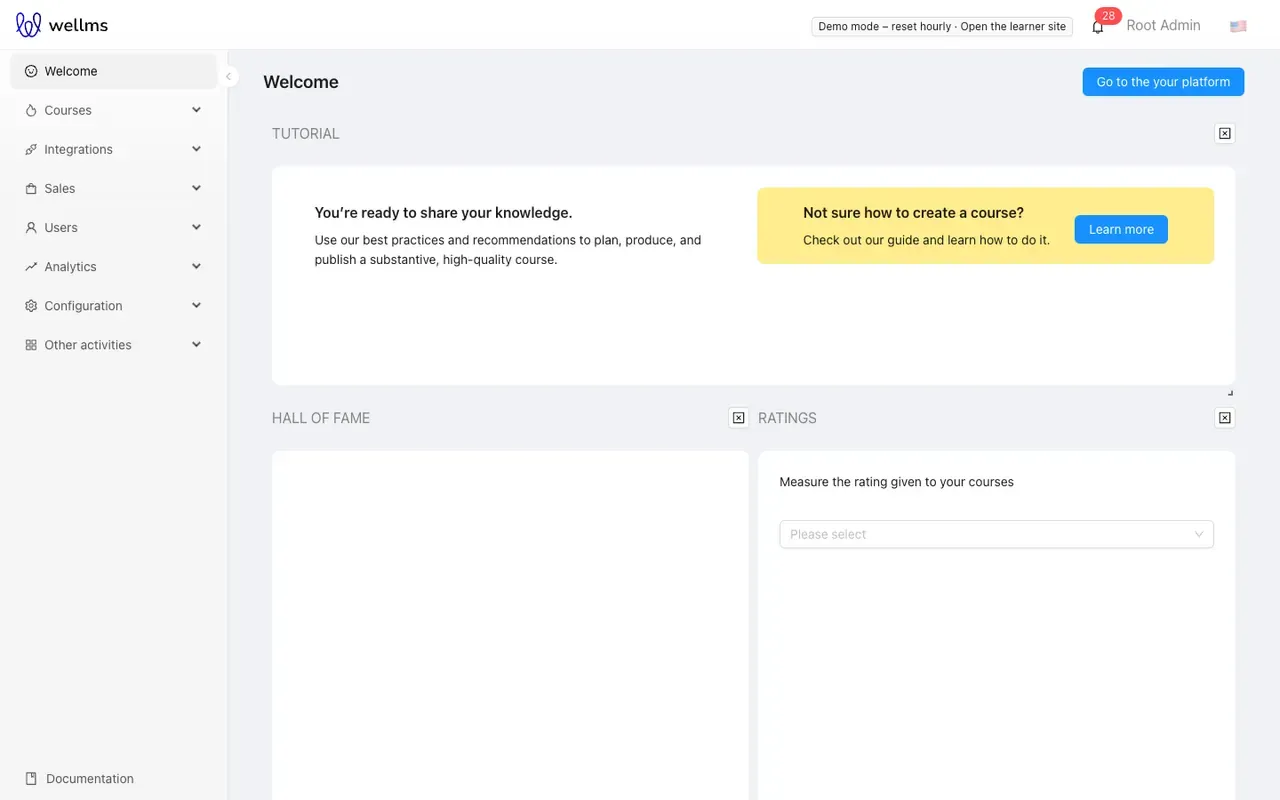
/welcome is the start page. It needs only the access dashboard permission. It is a grid of
widgets that you can drag, resize, remove and add back with the Add widget:
- tutorial, your courses, hall of fame (best selling and best rated courses), ratings, current users, customers and sales,
- pie charts of the report metrics: money spent per course, course popularity, time spent per course and tutor popularity.
The layout is saved in your browser (localStorage), not on the server, so it is per browser
and not shared with other administrators. The metrics come from the reports package; see
Reports and analytics.
When the global.frontURL setting is set, the dashboard shows a Go to platform button
that opens the learner site with your token appended (#/login?token=…, the format of the
legacy React learner app).
Menu structure
Section titled “Menu structure”The left menu is generated from
admin/config/routes.ts.
Each top-level group and where it is documented:
| Menu group | Screens | Documented in |
|---|---|---|
| Courses | Course list and editor, H5P content, LiaScript, SCORM packages, access requests, quiz reports | Content creators |
| Courses | Categories | Categories and tags |
| Courses | Webinars | Webinars |
| Courses | H5P libraries | H5P libraries |
| Integrations | LTI | LTI 1.3 integrations |
| Sales | Orders, payments, vouchers, products | Sales |
| Users | List, user fields | Users |
| Users | Roles and permissions | Roles and permissions |
| Users | User groups | User groups |
| Users | Notifications (push) | Notifications |
| Teacher, Competency challenges | Subjects, challenges | Teacher and competency challenges |
| Analytics | Notifications, reports, logs | Reports and analytics |
| Configuration | Files | Files |
| Configuration | Settings | Settings |
| Configuration | Templates (email, PDF, SMS) | Templates |
| Configuration | Translations, panel translations | Translations |
| Other activities | Consultations, consultation requests | Consultations |
| Other activities | Stationary events | Stationary events |
| Other activities | Questionnaires | Questionnaires |
| Other activities | Pages | Pages |
| Other activities | Tasks | Tasks |
| Other activities | Dictionary | Dictionaries |
My profile (/my-profile) is not in the menu; open it from the avatar menu. Tenants are
managed from the command line, not from the panel (Tenants).
Why a menu item is hidden
Section titled “Why a menu item is hidden”Every route in routes.ts has an access key, a named rule defined in
admin/src/access.ts.
A route whose rule is false is removed from the menu, and opening its URL directly shows the
403 page. A rule combines up to three checks:
- Permissions. Almost every rule requires
access dashboardplus at least one of the listed permissions. For example the Users group appears with any ofuser_list,permission_role_listoruser-group_list, and the Configuration group with any offile_list,settings_list,template_readortranslation_list. The permissions come from your roles; see Roles and permissions. - Installed packages. Some screens also need an API package to be installed, read from
GET /api/core/packages(for example Translations needsulams/translations, Dictionary needsulams/dictionaries, H5P needsulams/h5p). The Teacher and Competency challenges screens depend on packages that are not part of this repository. - Settings. An administrator can hide items for everyone with boolean
globalsettings named after the route:hideInMenu-CoursesCategories,hideInMenu-OtherDictionary,hideInMenu-ConfigurationTranslationsand so on. Some features have their own switch:disable-ECommercehides Sales,disable-Certificateshides the PDF templates tab. If such a setting holds an array of role names instead of a boolean, the item is hidden only for users whose every role is in the array. See Settings.
Pages in this section
Section titled “Pages in this section”The other pages of this section cover sales, webinars, consultations, stationary events, tasks, questionnaires, reports and analytics, H5P libraries, LTI, teacher and competency screens, tenants and demo mode.